
Quick Links:
- Getting Started
- Creating Content
- Curating Your Content
- Creating Assignment, Discussions, or Quizzes
- Gradebook Setup
- 3rd Party Integrations
- Launch Time!
This checklist is tailored for Homewood faculty teaching AS & EN courses. If you are teaching in a different division, the policies, procedures, and 3rd party tools may be different. Contact your Teaching & Learning support center for details.
1 – Getting Started
Merging Sections
Your first step should be to merge your sections in Canvas. In Canvas lingo, this is referred to as cross-listing. Cross-listing allows you combine several “child” sections into one main “parent” section. For example, a course has 3 sections (.01, .02, .03) that meet at the same time and have the same assignments and content. Section .01 is designated as the “parent”, and .02/.03 are designated as the “child” courses. Cross-listing is also used for some courses that have a 400 section and a 600 section with the same course content.
To request cross-listing, please contact [email protected] with your course number, and the section you want to be the “parent”.
After cross-listing, you manage course content in the “parent” section only, avoiding duplicate work. It is important to complete the cross-listing process early, before the course is published or any student work is submitted. Most 3rd-party tools work more smoothly when cross-listing is completed before the tool is activated.
Cross-listing has many advantages in Canvas:
- Assignments due dates can vary by section
- Assignments can be targeted for only certain sections
- The Gradebook can be filtered by section
- TAs can be assigned to grade just one section
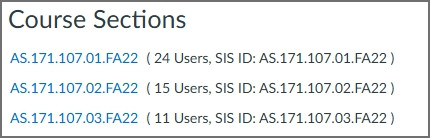
An example of a cross-listed course:
Adding TAs
After you have taken care of cross-listing, the next step is to add TAs to your course.
Before adding a user to your course, review the Canvas Roles and Permission guide. Canvas has customized roles that you may be interested in (such as Guest Facilitator and Observer).
Once you have picked the best role for your needs:
- Navigate to your course menu and select People.
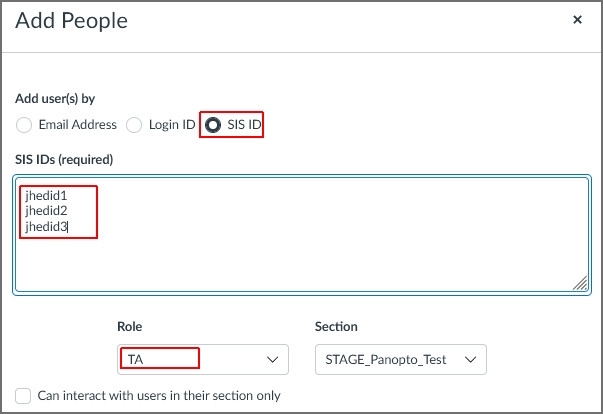
- Select the +People button on the right side of the screen.
- Choose Add User by SIS ID. At JHU, this is our JHED ID.
- Enter the JHED ID (such as flast1) in the Email Address (required) field. You only need to enter the JHED such as flast1.
- Choose the appropriate role, such as Teaching Assistant. Designate a specific section from the drop-down menu if necessary.
- Select Next
- If the user is not found and their JHED ID is correct, it may be that the user has yet to log into Canvas for the first time. This can happen for new grad students. In this case, have the user log into Canvas, then try again.
- Choose Add Users to complete the enrollment.
NOTE: The Teacher and Student roles can only be enrolled via SIS. If you have a co-instructor who is not seeing your course, please contact your program administrator to have them added in SIS, or add them in the TA role.
For more information, please review Adding People to Your Course.
2 – Creating Content
Adding the CTEI Formatting Toolkit to Your Course
Before building out your Canvas course, consider formatting and styling. CTEI has created a formatting toolkit that can be easily downloaded into your course, adding headers and sub-headers, icons, accordions, tabs and much more!
For more information on downloading the kit, see this page or email [email protected].
Adding Your Syllabus
Please add your expanded course description to AEFIS using the “Course Syllabus” link from the navigation menu. Select Edit, add your information, and then use the top Publish button to finalize your syllabus.
You can also use the Canvas “Syllabus” link if you would like the students to be able to view a running list of assignments and activities with due dates.
Importing Content from Previous Courses or Staging Courses
You can import an entire course or selected items from a course. Imports will not include student work or participation.
- How to import content from a previous course or staging course
- How to import selected items from a course
NOTE: By default, imported assignments can be found in an “Imported Assignment Group” weighted at 0%, you will need to move these assignments to a different assignment group for them to calculate into the gradebook.
3 – Curating Your Content
Modules are a way to structure your content in the course sequentially, either by Day, Week, Unit, Topic, or any other thematic method. Modules can include content pages, assignments, discussions, quizzes, files, web links, and other course resources.
NOTE: Remember to publish your Module headers to ensure the content within is viewable.
Did you want to delay when students access content or activities?
For Modules…
You can select the three dots to the right of your Module title and select Edit. If you check Lock Until you can set a date and time to release your Module content to students (the module header and content must be published, it will not auto-publish when releasing content).
For Pages…
When editing a page, you can set a release date and time for an individual page.
For Files…
From the Module view, select the three dots to the right of an individual file and set a release date and time for the file.
For Assignments, Quizzes, and Discussions…
When editing an assignment, quiz, or discussion, you can set an Available From date and time to control when a student can access an assignment.
4 – Creating Assignments, Discussions, Quizzes
Make Placeholders
Even if you are not ready to add the details for an assignment, creating place holders and providing due dates will help students plan accordingly. You can create graded assignments, discussions, and quizzes. Each of these allow you to set a due date and control the time range in which the learning activity is available to students.
NOTE: Once students begin participating in a learning activity, DO NOT adjust the point values of the assignment or change the activity into a group assignment.
Help Guides
No Submission Assignments
Need a column in the gradebook to enter a score? Create an assignment and select “No submission” as the assignment type.
5 – Gradebook Setup
To ensure your gradebook calculated properly, please set a Grading Scheme in your Course Settings that aligns with your syllabus. Follow this guide on enabling your grading scheme.
Weighted Grading
To use weights to calculate your gradebook, please follow these instructions: How do I weight the final course grade based on assignment groups?
NOTE: If you have ten quizzes that count as 20% of the final grade, if the quizzes are not of equal point values, the quiz scores will calculate proportional to their point values rather than equally. By default, the Total grade column in Canvas is not visible to students at KSAS and WSE.
Tips and Tricks
Additional recommendations for your gradebook.
Move the Total Column
You can move the Total column to the front of your gradebook for quick reference. To do this, scroll to the right in your gradebook until you reach the Total column. Hover on the title of the column and select the three dots, then select Move to front from the menu.
Automatically apply grade for missing submissions
When Canvas calculates the final grade that can be pushed to SIS, any empty column is calculated as a zero. To avoid confusion around student grade totals, select Settings in your gradebook and check the box Automatically apply grade for missing submissions. Check that the Grade for missing submissions is zero and select Apply Settings at the bottom of the settings panel.
If you grade student submissions in Speedgrader and want to control when a student receives notifications about instructor comments or their assignment grade, consider using a Manual Posting Policy for your gradebook to control when you release an assignment grade to students. Select Settings in your gradebook and navigate to the Grade Posting Policy tab. Next, select Manually Post Grades and select the Apply Settings button at the bottom of the settings panel. The following instructional page also provides step-by-step information: selecting a grade posting policy for your course gradebook.
Using the Manually Post Grades setting means you will need to post each assignment grade throughout the semester.
Alternatively, you can retain the “Automatically Post Grades” policy and set a manual posting policy for individual assignments as well.
Step-by-step instructions: selecting a grade posting policy for an individual assignment.
6 – 3rd Party Integrations
Don’t forget about additional tools you think you might need. Here are several to consider:
eReserves – If you have not emailed your syllabus/readings to [email protected], please do so ASAP!
Panopto Video Provisioning – Clicking on this link in your course or the Panopto icon from the rich content editor will create a course specific folder for your videos.
Turnitin – Did you enable Turnitin for your file submission assignments?
Gradescope – Set up your Gradescope/Canvas integration, if needed, Using Gradescope with Canvas
VoiceThread – is no longer a link on the course navigation menu, but it can be utilized through Canvas Assignments or in a Module. Learn more about How to Use VoiceThread in Canvas.
7 – Launch Time!
Take a moment to double check a few critical settings in your course.
Step 1: Double Check Your Content/Modules
- Are your Module headers published?
- Have you published the content and activities you want students to access?
HINT! Use the “Student View” feature to see what a student would see in your course. It doesn’t work for 3rd pary tools, but it can be a great way to make sure your Canvas content is ready for your students. Read more about it at the following webpage: How do I view a course as a student
Step 2: Review Course Settings
(Navigate to Settings on your course navigation menu)
- Did you want to add an image to represent your course?
- Did you want to adjust how many announcements appear at the top of your home page?
- To adjust this, scroll to the bottom of the Course Details tab and select More Options. Adjust the number of announcements to appear at the top of your home page and Save your selections.
- Is your Course Navigation Menu satisfactory? You can check this by using Student View.
- To adjust in Settings, select the Navigation tab and drag the items you would like to hide from your course navigation menu below the Hide from Student line. Save your selections.
Step 3: Publish Your Course
Select Publish from your course’s Homepage or the course card on your Dashboard. Your course cannot be accessed by students until it is published.
Step 4: Post a Welcome Announcement
Consider creating a welcome announcement AFTER you have published your course, as students will not receive any course notifications until after the course has been published.